Google Mobile Ads
This guide shows you how to integrate our BlueStack mediation adapter of Google Mobile Ads SDK with your current Android app and set up additional request parameters.
Release notes can be found here
Supported ad formats
- Banners
- Interstitials
- Native Ads
- Rewarded Video
Requirements
- Android SDK 6.0 (API level 23) or later
- Google Play services 24.9.0 or later
Set up Google Ad Manager
The following steps are needed to add us as a Demand partner in Ad Manager. These changes need to be set up in Google Ad Manager.
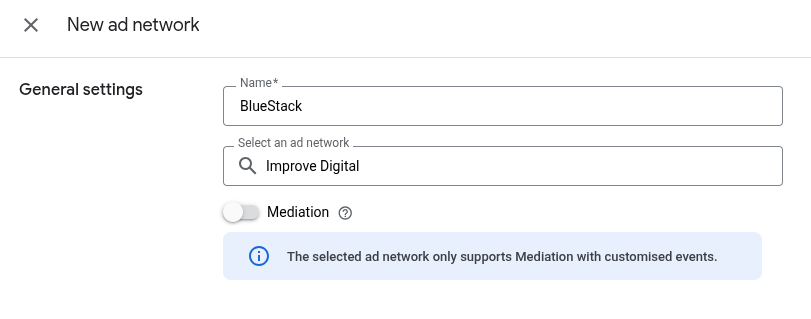
Add a new Ad Network
First you need to add us as an Ad Network in Google Ad Manager
- Under Admin, go to Companies
- Click the New Company button and select Ad Network
- For the name, you can use BlueStack, but you are free to enter what you want here
- For Ad Network, please select Improve Digital
- Don't forget to enable the Medation toggle
- Other fields can be ignored
- Press Save
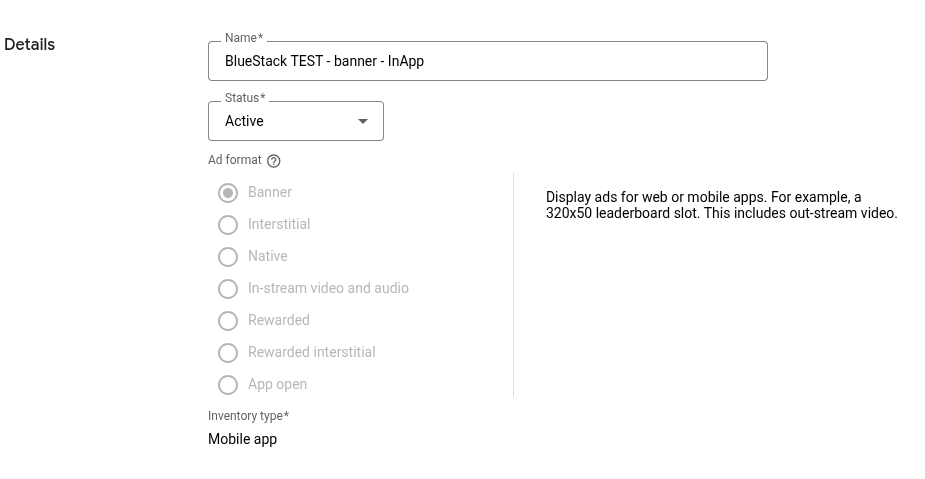
Add Yield Groups
Next we need to add some yield groups.
The basic rule is that for each available format you add one yield group (so one for Banner, one for Interstitial, etc.)
If you already have Yield Groups set up you can skip this step.
- Under Delivery, go to Yield Groups
- Click the New Yield Group button
- Insert any name you wish to use
- Select the correct Ad Format
- Inventory type should be set to Mobile App
- For Banner, select at least one size that best fits
- Please make sure your app's placements are targetted for this Yield Group
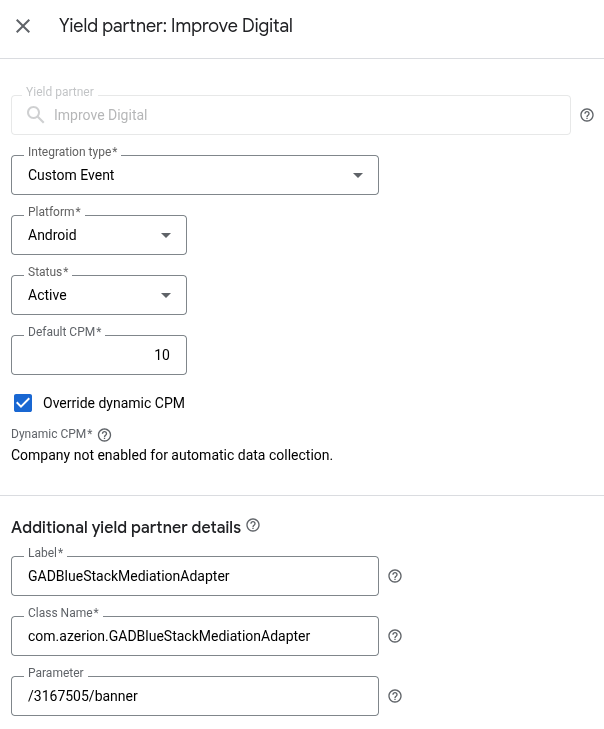
Add A Yield Partner and Define a custom event
Now you have to add us as a Yield partner in the Yield Group you just created,
or on a yield group you already have set before.
- Open the
Yield Groupyou want to add us as a partner - Scroll down on the page and click the Add yield partner button
- As yield partner, choose the company you added in [Add a new Ad Network]
- Select integration type Custom Event
- Select Platform Android
- Select Status Active
- Default CPM will be provided by your Azerion representative
- For Label, use: GADBlueStackMediationAdapter
- For Class Name, use: com.azerion.GADBlueStackMediationAdapter
- As parameter, please enter the placement ID provided by your Azerion representative that matches the format you intend to use this yield group for
- Repeat for each Yield group / format
Set up BlueStack Mediation adapter in Application
SDK Integration
Add BlueStack Core SDK:
In the main build.gradle of your project, you must declare the Bluestack repository:
allprojects {
    repositories {
            google()
            mavenCentral()
    }
}
In the build.gradle of to your application module, you can now import the Bluestack Google Adapter SDK by declaring it in the dependencies section:
dependencies {
    implementation 'com.azerion:bluestack-sdk-core:6.0.6'
    implementation 'com.azerion:bluestack-google-adapter:6.0.6.0'
}
Initialize the BlueStack Core SDK
See the Set Up Sdk Section
Bluestack Mediation
See the Mediation Partners
Set up Ad Formats
Banner and Interstitial
No additional code is required for integration. may now use MNG DFP Adapter to show Interstitial Ads and Banner Ads the same way it's described in the DFP Documentation.The adapter code and the setup you did on your Google Ad Manager UI will allow MNG Ads to deliver ads.
Native Ads
-
Assumes that your ad layout is in a file call ad_unit_dfp.xml for exemple in the res/layout folder.
-
The following code demonstrates how to build an AdLoader that can load native ads:
val adLoader = AdLoader.Builder(this, "YOUR PLACEMENT ID")
    .forNativeAd { nativeAd ->
        // This method sets the text, images, and the native ad, etc. into the ad view.
        val unifiedAdBinding = AdUnifiedBinding.inflate(layoutInflater)
        populateNativeAdView(nativeAd, unifiedAdBinding)
    }
    .withAdListener(object : AdListener() {
        override fun onAdFailedToLoad(errorCode: LoadAdError) {
            // Handle the failure by logging, altering the UI, etc.
        }
    })
    .withNativeAdOptions(adOptions)
    .build()

adLoader.loadAd(AdManagerAdRequest.Builder().build())
- Once you have loaded an ad, all that remains is to display it to your users.
    /**
     * Populates a [NativeAdView] object with data from a given [NativeAd].
     *
     * @param nativeAd the object containing the ad's assets
     * @param unifiedAdBinding the binding object of the layout that has NativeAdView as the root view
     */
    private fun populateNativeAdView(nativeAd: NativeAd, unifiedAdBinding: AdUnifiedBinding) {
        val nativeAdView = unifiedAdBinding.root

        // Set the media view.
        nativeAdView.mediaView = unifiedAdBinding.adMedia

        // Set other ad assets.
        nativeAdView.headlineView = unifiedAdBinding.adHeadline
        nativeAdView.bodyView = unifiedAdBinding.adBody
        nativeAdView.callToActionView = unifiedAdBinding.adCallToAction
        nativeAdView.iconView = unifiedAdBinding.adAppIcon
        nativeAdView.priceView = unifiedAdBinding.adPrice
        nativeAdView.starRatingView = unifiedAdBinding.adStars
        nativeAdView.storeView = unifiedAdBinding.adStore
        nativeAdView.advertiserView = unifiedAdBinding.adAdvertiser

        // The headline and media content are guaranteed to be in every NativeAd.
        unifiedAdBinding.adHeadline.text = nativeAd.headline
        nativeAd.mediaContent?.let { unifiedAdBinding.adMedia.setMediaContent(it) }

        // These assets aren't guaranteed to be in every NativeAd, so it's important to
        // check before trying to display them.
        if (nativeAd.body == null) {
            unifiedAdBinding.adBody.visibility = View.INVISIBLE
        } else {
            unifiedAdBinding.adBody.visibility = View.VISIBLE
            unifiedAdBinding.adBody.text = nativeAd.body
        }

        if (nativeAd.callToAction == null) {
            unifiedAdBinding.adCallToAction.visibility = View.INVISIBLE
        } else {
            unifiedAdBinding.adCallToAction.visibility = View.VISIBLE
            unifiedAdBinding.adCallToAction.text = nativeAd.callToAction
        }

        if (nativeAd.icon == null) {
            unifiedAdBinding.adAppIcon.visibility = View.GONE
        } else {
            unifiedAdBinding.adAppIcon.setImageDrawable(nativeAd.icon?.drawable)
            unifiedAdBinding.adAppIcon.visibility = View.VISIBLE
        }

        if (nativeAd.price == null) {
            unifiedAdBinding.adPrice.visibility = View.INVISIBLE
        } else {
            unifiedAdBinding.adPrice.visibility = View.VISIBLE
            unifiedAdBinding.adPrice.text = nativeAd.price
        }

        if (nativeAd.store == null) {
            unifiedAdBinding.adStore.visibility = View.INVISIBLE
        } else {
            unifiedAdBinding.adStore.visibility = View.VISIBLE
            unifiedAdBinding.adStore.text = nativeAd.store
        }

        if (nativeAd.starRating == null) {
            unifiedAdBinding.adStars.visibility = View.INVISIBLE
        } else {
            unifiedAdBinding.adStars.rating = nativeAd.starRating!!.toFloat()
            unifiedAdBinding.adStars.visibility = View.VISIBLE
        }

        if (nativeAd.advertiser == null) {
            unifiedAdBinding.adAdvertiser.visibility = View.INVISIBLE
        } else {
            unifiedAdBinding.adAdvertiser.text = nativeAd.advertiser
            unifiedAdBinding.adAdvertiser.visibility = View.VISIBLE
        }

        // This method tells the Google Mobile Ads SDK that you have finished populating your
        // native ad view with this native ad.
        nativeAdView.setNativeAd(nativeAd)
    }
Rewarded video Ads
- The following code demonstrates how to load a rewarded ad:
AdManagerAdRequest.Builder adRequestBuilder = new AdManagerAdRequest.Builder();
adRequestBuilder.addNetworkExtrasBundle(
        GADBlueStackMediationAdapter.class,
        getExtrasData()
);

RewardedAd.load(
        context,
        DFP_REWARDED_AD_UNIT,
        adRequestBuilder.build(),
        new RewardedAdLoadCallback() {

            @Override
            public void onAdLoaded(@NonNull RewardedAd rewarded) {
                rewarded.setFullScreenContentCallback(new FullScreenContentCallback() {
                    @Override
                    public void onAdFailedToShowFullScreenContent(@NonNull AdError adError) {
                        // Handle the failure by logging, altering the UI...
                    }
                });
            }

            @Override
            public void onAdFailedToLoad(@NonNull LoadAdError error) {
                // Handle the failure by logging, altering the UI...
            }
        }
);
- Once you have loaded an ad, all that remains is to display it to your users.
private void displayRewardedAd() {
    mRewardedAd.show(activity, new OnUserEarnedRewardListener() {
        @Override
        public void onUserEarnedReward(@NonNull RewardItem rewardItem) {
            // TODO: Handle the reward (e.g., give the user coins or unlock content)
        }
    });
}
Custom targeting / Keywords
If you need to send your custom key-value pairs. You can specify key-value-targeting and keywords information in the ad request as follows:
AdManagerAdRequest request = new AdManagerAdRequest.Builder()
        .addKeyword("Keyword")
        .addCustomTargeting("key1", "value1")
        .addCustomTargeting("key2", "value2")
        .build();
and you must send your custom key-value pairs also as follows:
1- Create a bundle of the extras :
Bundle extras = new Bundle();
extras.putString("customTargeting","key1=value1;key2=value2");
extras.putString("keywords","key1=value1;key2=value2");
2- Add the extras to the addNetworkExtrasBundle() method as follows:
AdManagerAdRequest adRequest = new AdManagerAdRequest.Builder();
adRequest.addNetworkExtrasBundle(GADBlueStackMediationAdapter.class,extras)
.build();
The GADBlueStackMediationAdapter value corresponds to custom event adapter class name.