Getting Started
This section explains how to get started with the BlueStack Unity Plugin. It guides you through the process of adding the BlueStack Unity Plugin to your project. After following this section you’re being able to getting started with the more advanced features of the BlueStack Unity Plugin.
Looking for a working reference? Our public demo app on GitHub — azerion/bluestack-demo-unity — showcases the BlueStack Unity SDK across banner, interstitial, rewarded, and native ad formats.
Prerequisites
| Requirement | Minimum |
|---|---|
| Unity | 2020 or higher |
| Android | API level 21+ (target 34+), JDK 17+ |
| iOS | 13.0+, Xcode 15.3+, CocoaPods |
Import the package
Follow the steps listed below to ensure your project includes the BlueStack SDK.
-
Add scoped registries in
Edit -> Project Settings -> Package Manager -> Add Scoped Registry -
Add npm registry for BlueStack
Name: AzerionURL: http://registry.npmjs.comScope(s): com.azerion.bluestack -
BlueStack Unity package has a indirect dependency of EDM4U which need to be resolved using UPM.
Name: package.openupm.comURL: https://package.openupm.comScope(s): com.google.external-dependency-manager -
Update
Packages/manifest.jsonPackages/manifest.json{"dependencies": {"com.azerion.bluestack": "6.0.0"}}
Manage Dependencies
BlueStack Unity plugin maintains native BlueStack SDK version compatibility. To accomplish this BlueStack Unity plugin is distributed with the EDM4U. It provides Unity plugins the ability to declare dependencies(Android specific libraries (e.g., AARs) or iOS CocoaPods), which are then automatically resolved and copied into your Unity project.
Note: The BlueStack Unity plugin dependencies are listed in Packages/com.azerion.bluestack/Editor/BlueStackDependencies.xml file.
- Android
- iOS
1. Add repository dependencies
- Unity version 2022 or newer
- Unity version 2021 or older
Open the file settingsTemplate.gradle file in Assets/Plugins/Android.
If you don't have such a file, go to Project Settings > Player > Publishing Settings
and enable the Custom Gradle Settings Template gradle option.


Add the following repo dependencies.
    dependencyResolutionManagement {
        ...
        repositories {
            ...
            google()
            mavenCentral()
            maven {
                url 'https://packagecloud.io/smartadserver/android/maven2'
            }
        ...
        }
        ...
    }
Open the file baseProjectTemplate.gradle file in Assets/Plugins/Android.
If you don't have such a file, go to Project Settings > Player > Publishing Settings
and enable the Custom Base Gradle Template gradle option.


Add the following repo dependencies.
allprojects {
    ...
    repositories {
        ...
        google()
        mavenCentral()
        maven {
            url 'https://packagecloud.io/smartadserver/android/maven2'
        }
    ...
    }
    ...
}
2. Enable the Custom Main Gradle Template
Add mainTemplate.gradle. Go to Project Settings > Player > Publishing Settings and enable the mainTemplate gradle option.


3. Resolve Android Dependencies
In the Unity editor, select Assets > External Dependency Manager > Android Resolver > Resolve. T
he Unity External Dependency Manager library will copy the declared dependencies from BlueStackDependencies.xml
into the Assets/Plugins/Android/mainTemplate.gradle file of your Unity project.
dependencies {
    implementation fileTree(dir: 'libs', include: ['*.jar'])
// Android Resolver Dependencies Start
    implementation 'com.azerion:bluestack-sdk-core:6.0.0'
// Android Resolver Dependencies End
**DEPS**}
If EDM4 doesn't copy the dependencies into mainTemplate.gradle
then you can manually add those dependencies or force EDM4 via
Assets > External Dependency Manager > Android Resolver > Force Resolve
Known android build issues and solution
- Kotlin module issue
More than one file was found with OS independent path 'META-INF/annotation-experimental_release.kotlin_module'
Please add the following config into launcherTemplate.gradle
android {
    ...
    packagingOptions {
        exclude("META-INF/*.kotlin_module")
    }
    ...
}
    <iosPods>
        <iosPod name="BlueStack-SDK" version="6.0.0" bitcodeEnabled="false"
                addToAllTargets="false"/>
    </iosPods>
-
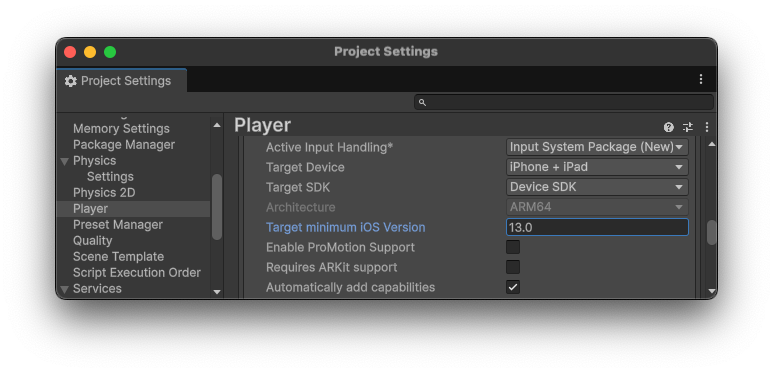
BlueStack iOS framework needs to have minimum iOS version
13.0. -
Go to the player settings and set the
Target minimum iOS Versiongreater than or equal to13.0.
-
In the Unity editor, select
File > Build Settings > Build. The Unity External Dependency Manager library will copy the declared dependencies fromBlueStackDependencies.xmlinto thePodfilefile to theUnityFrameworktarget of your Unity-iPhone app.
source 'https://cdn.cocoapods.org/'

platform :ios, '13'

target 'UnityFramework' do
  pod 'BlueStack-SDK', '6.0.0'
end
target 'Unity-iPhone' do
end

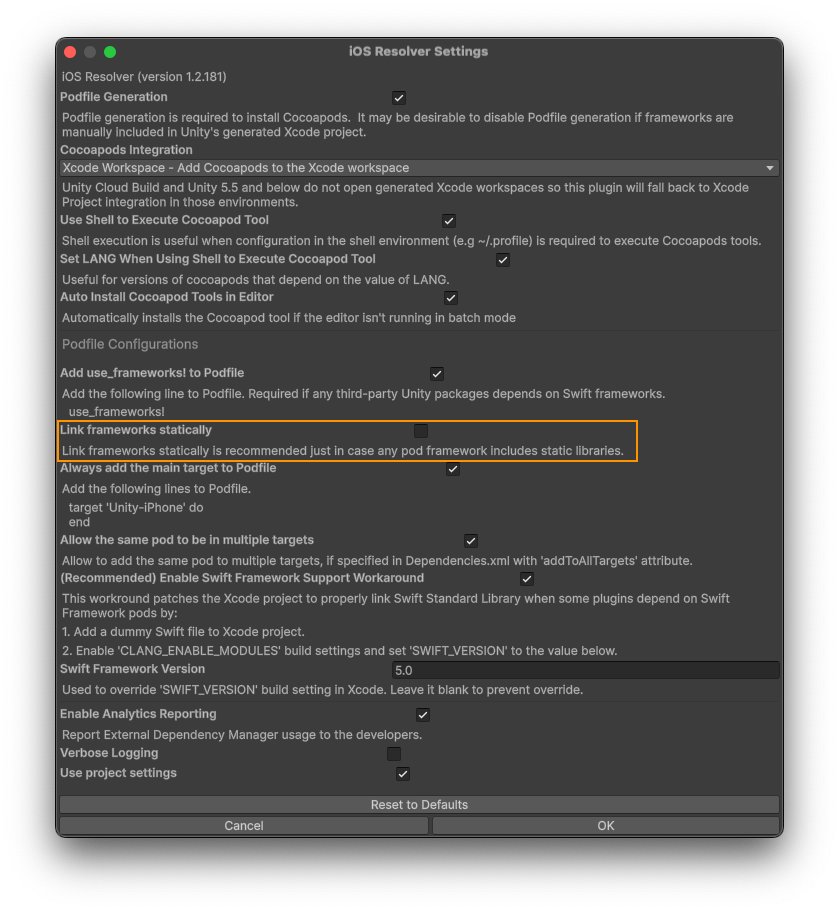
- It is recommended to remove
:linkage => :staticfrom thePodfilefile or uncheckLink frameworks staticallyfrom iOS Resolver Settings of EDM4U. - If EDM4U failed to resolve the dependencies that are in
Podfilethen you need to manually resolve those dependencies by executingpod install --repo-updatefrom the terminal.
Initialize the BlueStack SDK
Before loading ads, you need to initialize the BlueStack SDK by calling BlueStackAds.Initialize().
This needs to be done only once, ideally at app launch.
Note: You will have to register your app in BlueStack console to get an appId for your app.
Here's an example of how to call Initialize() within the Start() method of a script attached to a GameObject:
using Azerion.BlueStack.API;
using Azerion.BlueStack.API.Banner;

public class BlueStackAdController : MonoBehaviour
{
    public void Start()
    {
        // Optional: enable verbose native SDK logging.
        // The current state is also exposed via BlueStackAds.IsDebugModeEnabled.
        BlueStackAds.SetDebugMode(true);

        // Initialize the BlueStack SDK.
        BlueStackAds.Initialize(appId, HandleInitializationComplete);
    }

    // The callback runs on the Unity main thread once SDK initialization finishes.
    // InitializationStatus carries the per-adapter readiness state.
    private void HandleInitializationComplete(InitializationStatus status)
    {
        foreach (KeyValuePair<string, AdapterStatus> entry in status.AdapterStatusMap)
        {
            Debug.Log("Adapter Name: " + entry.Value.Name + ", " +
                      "Adapter State: " + entry.Value.InitializationState + ", " +
                      "Adapter Description: " + entry.Value.Description);
        }

        if (BlueStackAds.IsInitialized)
        {
            Debug.Log("BlueStack SDK is ready to load ads.");
        }
    }
}
Migrating from v3.x: The Initialize signature has changed in v6.0.0. The Settings parameter and the
separate SDKInitializationStatus callback have been removed. Use BlueStackAds.SetDebugMode(bool) to toggle
debug logging at any time, and read BlueStackAds.IsInitialized to check readiness. The single completion
callback now delivers per-adapter InitializationStatus directly.
Mediation Ad Network
BlueStack SDK mediation feature enable you to server ads from multiple sources including our Ad Exchange and third-party ad networks.
To load ads from third party ad networks, you will have to first configure each ad network for your app on BlueStack console.
Settings
BlueStack setings allows you to configure mediation networks.
To open the setings, select Azerion > BlueStack > Settings from the menu.
Configure AdMob App ID
- You can insert AdMob App ID here for both iOS and Android platforms.
Select Mediation Networks
- You can choose your prefered mediation networks from the list. Check the Mediation Networks documentation for more details.
Recommended: enable all mediation networks by default so the SDK can serve from every available demand source. Omit a network only if you have a specific reason not to ship that demand source. EDM4U will resolve the matching native dependencies automatically.

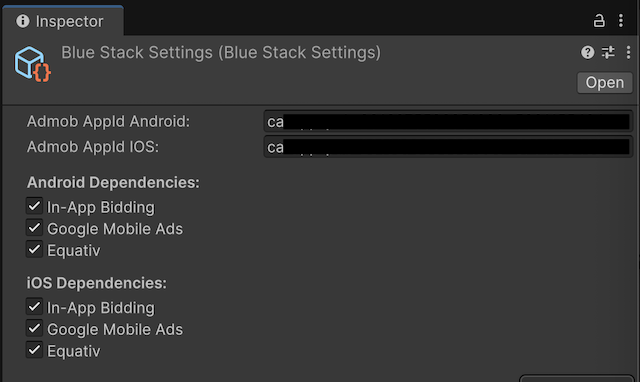
You need to resolve or force resolve Android dependencies via EDM4
Assets > External Dependency Manager > Android Resolver > Force Resolve
every time you add/remove any mediation networks from the Settings.